


Mineral Classification part 1
Let's do a class activity first. We are going to line up all the students. A volunteer is then going to arrange all the other students based on appearance and other noticeable traits. The volunteer is going to create 2 groups first based on some characteristics and then split those two groups into two or more groups based on another characteristic. The rest of the class is going to then have to figure out how the groups were made based on the similar characteristics each group might have. Please don't use characteristics such as dumb, stupid, ugly, bad teeth, etc...
Minerals are classified very similarly to the activity above. If we know certain characteristics of minerals, we can then discover the mineral name.
The link below will take you to a Mineral Identification sheet. Keep this sheet with you until the end of this unit. You may complete this sheet using Google Docs or on a printout.
Snowflake HS, Holbrook HS, and Heber HS students click the Student Version of the Mineral Identification Lab.
The first and most obvious characteristic of minerals is their color. Minerals take on a variety of colors. Even though the color is very obvious, it is the least important characteristic to help us identify the mineral. The reason for this is that many of the same types of minerals come in many different colors. An example is a quartz. Color for sure can give you a clue.

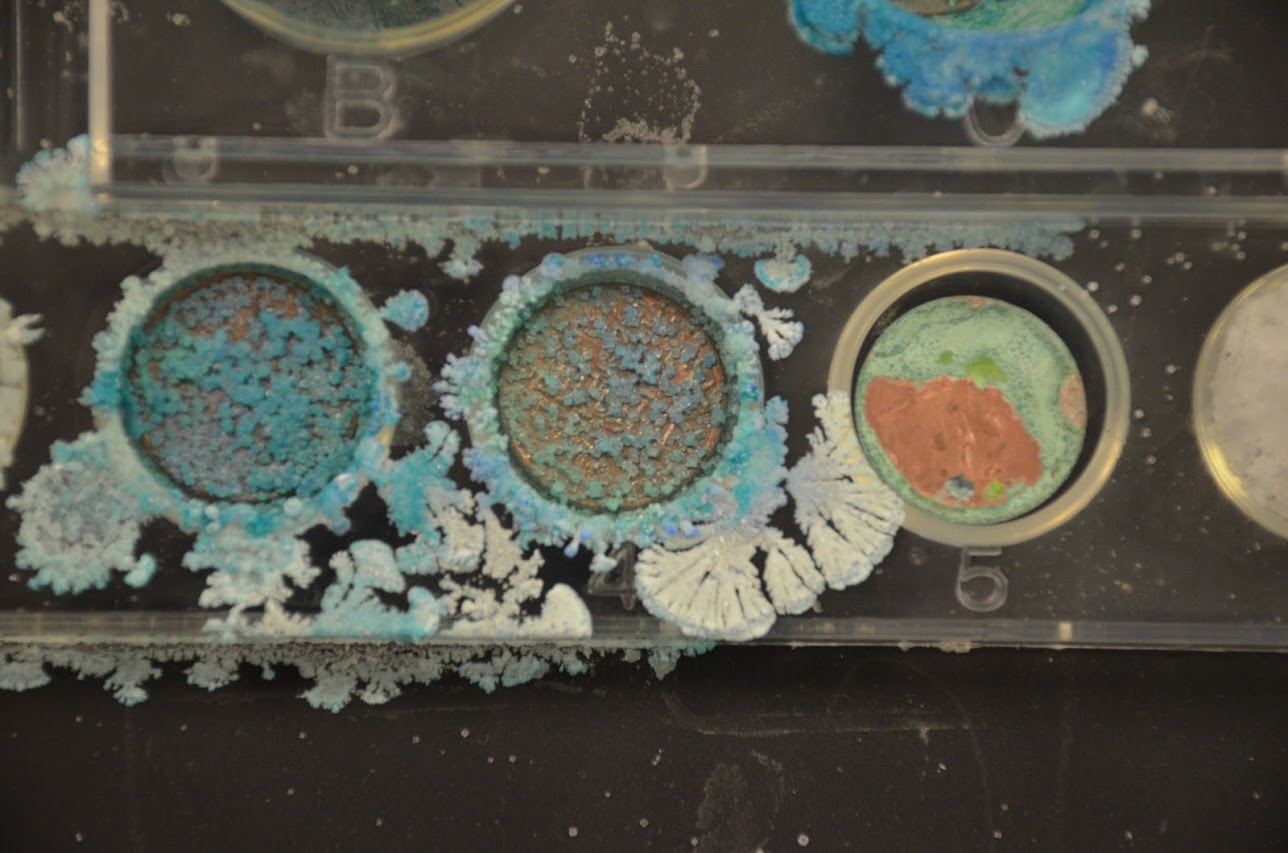
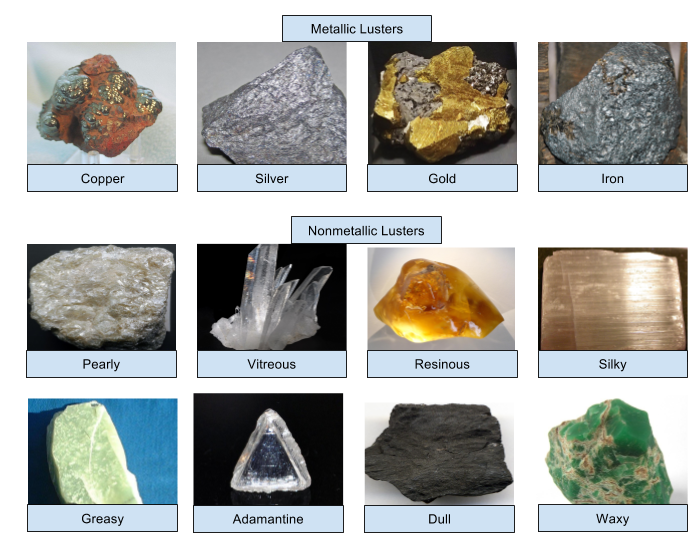
Another way to help identify minerals is by understanding their luster. Luster is how light is reflected from a mineral's surface. The two main types of luster are metallic and nonmetallic. Just ask yourself, does the mineral shine like gold, copper, silver, or iron? If it does then you would call these minerals metallic. If it doesn't shine like metal, then you would call it nonmetallic. Characteristics of nonmetallic luster are dull, pearly, and silky as well as almost any other color, white, yellow, brown, blue, etc. Anything that doesn't shine like metal is nonmetallic. Do not confuse shine as being metallic. Another method to help you understand metallic vs. nonmetallic is that metallic luster minerals tend to be denser. You can "heft" the mineral and if it feels heavy for its size, it might be metallic as well.
Color and Luster ID Assignment
- Individually look at all the minerals in your group's mineral box.
- On your Mineral Identification Lab sheet, in the shaded row for each mineral, write down the color and luster that each mineral has.
- For the colors, list the color that is the most prevalent. For the luster, mention whether it is metallic or non-metallic and if it is non-metallic decide which type of non-metallic based on the image above.
- Now compare with your group and in the second unshaded row of each mineral, write down the color and luster that the majority of your group had.
Another method of helping us identify the type of mineral is to understand how to perform a streak test. All you need to do is have a piece of unglazed porcelain tile and then streak the mineral across it. The color powder residue that is left behind is called the streak. Minerals do not always have a streak that is the same color as the mineral itself. True gold streaks gold yellow but pyrite also called fools gold, has a black streak.
The streak test only works for minerals that are softer than the streak plate.

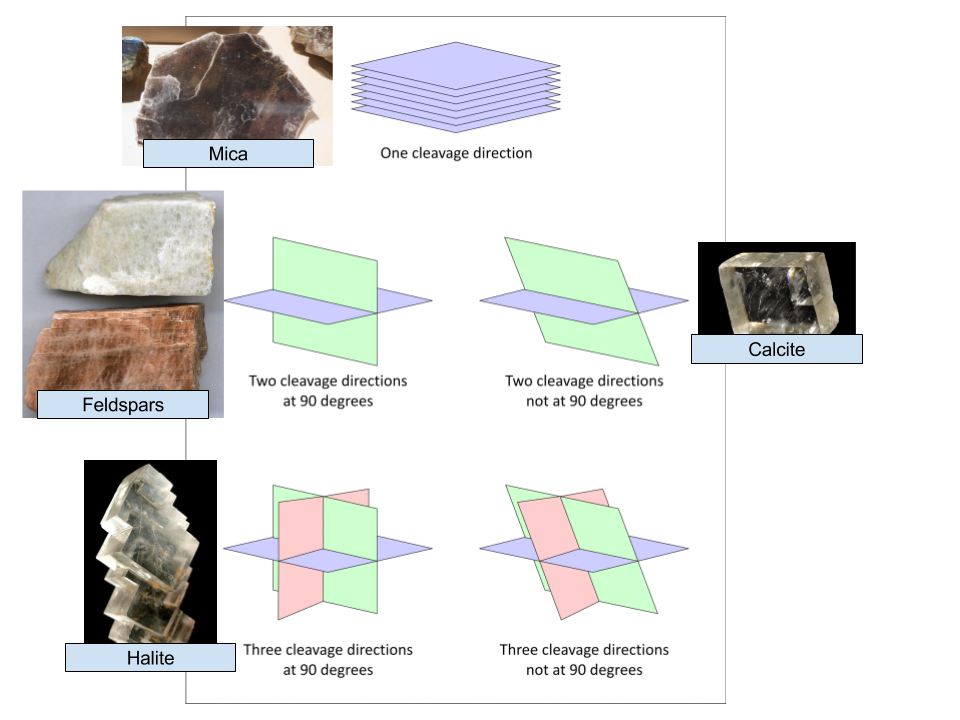
Another help in identifying minerals is to understand what a mineral's cleavage is. The cleavage is how a mineral breaks along smooth, flat surfaces. The way the cleavage is aligned is due to the arrangement of atoms. It is important to note that just because a mineral is smooth that it has good cleavage. Quartz has smooth crystals, but if you were to break a quartz crystal it would not break smoothly because quartz does not have good cleavage. For our purposes, we are going to be primarily concerned with whether or not a mineral has excellent, good, or no cleavage. One way to tell is to move the mineral around in the light to see if you get a sparkly, shiny glint to the mineral. If the light reflects very well back into your eye, then you have good to excellent cleavage. A mineral that doesn't have good to excellent cleavage reflects light back in too many directions, therefore, does not shine like a mineral with cleavage. You can demonstrate this effect with aluminum foil. When aluminum foil is flat and brand new, it reflects light very well because it is concentrated light in a few directions. Crumple and then uncrumple the tinfoil and you will see that the light is very scattered and not concentrated. Cleavage vs. non cleavage behaves the same way.
Streak and Cleavage Assignment
- Individually using a streak plate and your knowledge about mineral cleavage, write down in the gray row for each mineral the color of the streak and classify the cleavage as excellent, poor, or none (not having any).
- Now compare your answers with that of the group and then in the non-shaded cells, write down what the majority of your group felt the answers were.